Thursday, August 25, 2011

Shoelaces to Fit your Style


I don't know about your kids, but shoelaces are a big problem at my house. The problem is, that they either take them out to do various things, like tie each other up, or they somehow manage to fray the ends (maybe by chewing on them?), so they won't fit through the holes anymore. I once even received a note home from my son's teacher, that had his shoestrings attached with a stapler. It explained that he kept tying his shoes to his desk during class. The teacher got so fed up that he snipped the laces right off and send them home with the note!

Since my daughter had only one shoe lace for this pair of tennis shoes (typical). I made her a pair of fun polka dot ones. The coolest thing that I recently discovered, is called heat shrink tubing. To make these, I simply made some bias tape (actually it wasn't on the bias). Then stitched the the length of the laces on the open side. After that I slipped each end through the heat shrink tubing and heated it up with my embosser. What a quick fix to a shoe lace dilemma!


Sunday, August 21, 2011

The Old Fisherman and His Wife


Today is my oldest daughter, McKenna's, 19th birthday. She has been in Germany since the beginning of July and I miss her so much. So I thought I'd write a quick post in her honor. Before she left, she sculpted these two cute dolls out of clay. I just love them! She is so talented. She uses nothing but polymer clay and a toothpick to sculpt the faces and hands. For the wife's hair, she had a hard time finding anything around the house to use. So she cut my 5 year olds hair, and used it! I love her creativity. The bodies are made from wire and wrapped in tin foil. The clothes she found in my old Barbie box from when I was a kid. She told me that they were an old fisherman and his wife. 


This post card, dated August 1911, exactly 100 years ago, makes me think of what this little old couple might have looked like so long ago.

Saturday, August 20, 2011

Got Milk...caps?


Fresh milk, delivered daily to your door in a lovely glass bottle with a really cool top. From the 1880's to 1960's, this was how most families received their milk. After 1960 paper cartons became the norm for milk. While you can still get milk in glass bottles from a few dairies, they are few and far between. 

A couple of years ago, my husband started collecting these milk bottle tops for me. I love them.  I keep them in a big jar on my kitchen counter.  My kids and I, enjoy dumping them out and examining the uniqueness of each one. I hope you will enjoy looking at them too.


Wednesday, August 17, 2011

Decoupage Map Table

For my playroom, I wanted a kids table that was big enough to put 6 chairs around. I had a hard time finding one large enough. So, I got a kitchen table, painted the legs black, then cut them down several inches. To make it more interesting, I decoupaged old maps to the top. I love making these decoupage tables. I have made several, and I love the unique look each one has. 


To make this project you need:

Maps:
 A variety of colors and images is always nice when making a collage. So, I scanned old maps from a book I borrowed from a friend, then I printed them out. I also had on old atlas that I took apart and used the pages from. The atlas pages were very large, which was great, because it always takes more images than you thing to do a project like this.

Decoupage: 
I used Mod Podge with a gloss-lustre (you could also use watered down craft glue)

Scissors and Paper Cutter:
The paper cutter is good to trim off unwanted edges that sometimes occur when scanning from a book. I use scissors to fit small areas and table edges.

Other:
A plastic spatula works nicely to smooth large images into place. 
I used glossy black spray paint for the table legs.
After decoupaging, I sprayed the edges with glossy wood tone, to give it an aged look.
I also like to spray my completed collage with Polyurethane. This helps to protect it from spills and makes it much more durable, especially with kids!


Voila! Now you have really cool kids table with lots of room to draw, paint, and create!

Sunday, August 14, 2011

Vintage Beds, Vintage Style, Vintage Sizes


Yesterday, I saw the cutest little bed at a garage sale. Like many vintage beds, it was a bit of an odd size. It looked pretty narrow to me, and I thought it could pass for crib size in width. But it was very long. I hoped that if I cut the sides down I could use it as a toddler bed. I wasn't sure, but I took a chance and bought it.  When I got it home my guesses were correct. It fit a crib sized mattress perfectly, except that it was about 20 inches too long. Because of the way it was constructed I decided not to cut the length off the ends. But shortened it a bit further up.


After I cut 20 inches off each side, I used wood glue and mending plates to put the side rails back together. Ideally, it would have been best to cut the ends off, then screw the hardware back in place. But this bed did not have hardware attached, but it had pegs carved from it to fit the head and foot boards. I decided not to chance an ill fit by bothering with the ends, and went this route instead. I knew I would fold a quilt on the bottom of the bed and my seam would not show.


The bed in my daughter, Eliza's, room is also an odd size. I bought it at a garage sale too. It is bigger than a toddler bed but smaller than a twin. For this bed, I had a mattress custom made by a local mattress company. Generally, a mattress company can cut any size mattress down to fit. It costs a little more than a regular mattress but it was still pretty reasonable, even by my standards.


So, I guess what I'm saying is; if you see really cute little bed that you are tempted to buy, but aren't sure if a mattress will fit, take a chance, and get it. I love these odd little sized beds. They are so unique!


Friday, August 12, 2011

Confessions of a Collector

The word "collector" has always left a bit of a sour taste in my mouth. When I think of a collector, I in-vision a room filled with mountains of Beenie Babies toppling over, with the tags protected by clear plastic to keep them in "mint" condition. I think of an episode of Hoarders I once watched, where a man had to build a separate building to house his immense beer can collection. I think of doll collectors, who's entire homes are filled with dolls that can not be touched or played with, each standing at attention on their metal doll stands. I think of people spending huge amounts of money to buy items that are only of value to them. Needless to say, I have never wanted to call myself a collector.

About a year ago, a friend was asking me what kind of things I buy at estate sales. I began telling him several different items that I look for. "I collect paper dolls," I told him. ..."and old keys, and bottles, and quilts, and old books, and tin toys, and fisher price toys, and thimbles, and buttons, and...." the list went on and on. I suddenly made a giant realization, "I'M A COLLECTOR!!!" And a collector of the worst kind, one who collects EVERYTHING, even dolls!!

After my discovery, I began thinking a lot about collections, and why people collect. I recently read an article about why people collect. (http://www.horizonlines.org/volume4/about/why/index.html) In the article it states one reason is that, "Collecting, like most passions, has the capacity to let (the collector) live in another world for a while." I liked that explanation. When I pick up a children's book from 1940, I am immediately transcended to another time. A simpler time. A time before technology ruled our world. I time when kids played outside all day. A time when being a homemaker was a glamourous occupation. A time when people knew how to work hard and sacrifice.

There are many different reasons people collect. But one thing is certain, there are a lot of us out there. I would love to see what others collect, what brings them that little bit of joy in the acquisition. If you have a collection you would like to share, email me pictures at melissanobbs@msn.com and I'll post them here.

Here are a few of my own collections:


Wednesday, August 10, 2011

Beaded Bookmarks


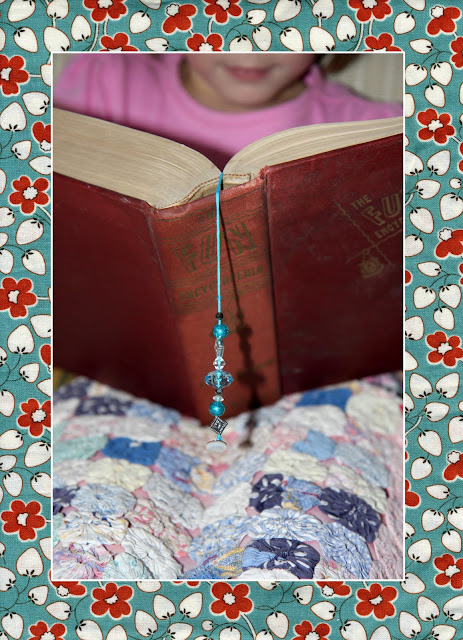
If you're like me, you grab the nearest piece of paper to mark your place when reading a book. I've used ticket stubs, envelopes, price tags, gum wrappers, a dollar bill, just about anything within my reach. Recently, I borrowed a book from my daughter. It had the cutest bookmark slipped between it's pages. My mom had made it for her out of embroidery floss, beads, and buttons. I used it while reading the book and found it to be the handiest little bookmark, so I thought I'd make a couple for myself.


Making these bookmarks is easy to do and is a perfect use of odd beads and buttons left over from other projects. Here's how:

1. Cut embroidery floss, hemp, or crochet thread 11-14 inches, depending on desired length. Most of mine where about 12 inches.

2. You will need an anchor for the bottom of the string to keep it in place. A button with a shank on the back works well for this. My son, Liam, had a great idea to use a small shell with a hole in it. A charm is another good idea. Use your imagination! Thread the string through and tie a good tight knot. Afterwards, put a small dab of glue or fray check on the knot to keep it tight.

3. On the other side of the floss, tie a double knot about 4 inches from the top. Then dip the end of the floss in glue or fray check. Smooth the floss to a point with your fingers and let dry. This will help to thread the beads on easier, especially ones with small holes.

4. This is the fun part, thread a variety of beads on, until you get about an inch and a half from the top.

5. For the top, you'll need a good anchor for here too. I found that another shank button works well. Tie the button tightly to the end, pulling it close to the other beads. Then, thread the floss back through the other beads to hide it (if you can).

6. Place a small dot of glue or fray check on the knot to keep it tight.

7. You now have a beautiful bookmark (and it only took about 5 minutes!) Feel free to discard the ticket from the parking garage you've been using for the last couple of months.


This is a quick, easy gift to give to teachers, or to slip in a thank you card. My kids had fun making them too! Last night, I hosted my book club, and thought this would be a perfect little party favor to give each member of our group. I printed off quotes about books, then cut slits in the paper to hold the bookmarks in place. I handed them out after dinner (kind of like a fortune cookie). I told them each to pick the quote that fit them best.

Saturday, August 6, 2011

Happy 100th Birthday Lucille Ball


Happy 100th Birthday to the Queen of Comedy! 100 years ago today, the greatest icon from the golden age of television was born. Her beautiful aprons, (always a different one on each episode of I love Lucy) inspired my to create my own vintage inspired aprons. Thanks Lucy! 

Thursday, August 4, 2011

It's Great to Be 8!


Turning 8 is a big deal in our church.  This year, Aidan turned 8 and was baptized on his birthday. I made this cake for him, and all the other children turning eight, in honor of their big day. To celebrate each of their baptisms we have them pick a candle off the cake and we sing the song that is taped to the bottom of it.

Each time I bring the cake out, the kids get so excited. I always have one or two people ask me (adults and children) if it is real. It looks good enough to eat, though I would not suggest it. I made it with styrofoam cake dummies and a mixture of plaster of paris, spackle, and latex calk. The poka dots I made with polymer clay. It was really a lot of fun to make. And the best part was, I didn't gain a single ounce from eating all the frosting, like I usually do when I make cakes!

Wednesday, August 3, 2011

Bottle Cap Magnets


These cute bottle cap magnets are fast, fun, and easy to make. It only takes a few minutes. This project is perfect to do with your kids.

Supplies Needed:
*bottle caps (purchase them online, at local craft store, or reuse from empty bottles with screw off caps)
*3/4 inch heavy duty magnets (I purchased mine at my local craft store- a few dollars for a package of 8)
*decoupage (if you don't have any plain old elmer's glue works fine too)
*1 inch craft punch or scissors (scissors work just fine but the punch will speed things along and give you a perfect circle)


Directions:
*Print out bottle cap sheet
*Punch or cut out desired images
*smear a small amount of decoupage on back of cut circle
*apply to top of bottle cap and smooth with finger
*apply a tiny bit more, with finger, to the top in one big circular swirl, making sure to get all the edges
*let dry, then apply 1 to 2 additional coats (drying between coats)

When the bottle caps are all dry just place the magnet inside the back of the crown. I don't glue mine in for two reasons; first it stays together just fine because the magnetic pull is so strong. Second, this way I can use the same magnet but just change the "cover" for a new look.

These would also be great charms for a bracelet or necklace. Just punch a hole and you are all set.

Bottle Cap Sheet

Tuesday, August 2, 2011

Timmy's Lost Leg (or Stories To Scare Young Children)


My favorite thing I did while visiting my family in Utah a couple of weeks ago, was read old children's books with my mom. She has quite a nice collection. I could sit and read them for hours! My favorite was a book titled, "Be Better Book". It is a book that was actually written to scare children into being good! It's filled with stories of children who eat bad food, like bananas and do other horrible things like that. The consequences of their actions are quite extreme, thus scaring kids half to death.  My favorite story is one about a little boy who just can't sit still. He wriggles so much that he wriggles his whole body into pieces. He ends up loosing his leg completely and the whole family has to go searching for it. It was so great! We were laughing so hard as we read it. I hoped it would stop my own children from wriggling so much, but they just laughed right along with us. They love the old stories as much as I do.


Monday, August 1, 2011

Mother Goose Nursery Rhymes


Here are a few of the little nursery rhyme vignettes I made for my friend's daughter, Bridget, last summer. I used vintage Knickerbocker dolls then dressed them with scraps of fabric from a quilt that I made for her. It was so much fun finding and collecting all the little pieces.